CSTA 2017
Welcome!
I hope you learned a lot from attending the Connecticut Science Teacher's Association Annual conference this year! Below you will find all of my slides (except of course the one that sent you here) and a brief description of what each slide is about. This page does contain some links to additional information but it is not sponsored and does not contain affiliate links.

Using circuits and code in your classrooms is super helpful for your students. They can develop logical thinking, follow the scientific method, and more, all through inquiry based learning. There are a lot of tools out there to help you, and your students learn how to use the technology in your classroom. Since you and your students are all beginners, I would choose a technology and coding language where there is a lot of documentation available readily for free. In these slides I recommend a lot of hardware and software because I like it and I like what you can do with it. Usually there are also fantastic guides on how to use each piece of technology. If I recommend a piece of hardware or software, I have most likely used it myself. There are a few exceptions to that rule, however, and I will mention that whenever something like that comes up.

There is no clear, distinct definition of who or what a Maker is. In general, a maker is somebody who seeks out learning and uses their skills combined with creativity to create something new. In the maker mentality, everything is a tool and everything is also a material to make with. Makers commonly use electronics, 3D printing, cardboard, and hot glue, along with anything else they find to make projects. The maker mentality is very similar to inquiry based learning, and maker education does follow a lot of the NGSS standards for education. Personally, I have not done a ton of research into NGSS standards because I am not a teacher and I don't have to know them or apply them.

The photos on the right of the slide are of projects that I have done. Top left and middle left are both pictures of the same project. It is a small boombox made out of a cardboard box with real electronics inside. It does work, and can play internet music or music off of an SD card. Bottom left is a small robot that can be controlled with a smartphone app. Top right is a hat with wearable lights sewn in that are programmed to blink in a pattern. Bottom right is a plant monitoring station. I find that these projects show a variety of what can be done with some simple electronics (although they seem complicated). You can include some simple code and electronics into a variety of STEM classroom settings, for example, a section on the weather can use temperature and barometric pressure sensors to learn more about the weather, and changes in the weather.

The Circuit Playground is one of my all time favorite boards. It has a bunch of sensors and programmable things. It also has really good documentation and a bunch of projects exist on different tutorial platforms to get some ideas for what you could do with it. The classic version of the board costs a little less than the express, and can only be programmed in the Arduino (my favorite language so far). The express version can be programmed in Arduino too. It costs more than the classic, but it includes additional sensors, and can be programmed using Microsoft's MakeCode and Circuit Python in addition to Arduino. If you want to program in something other than Arduino, you can put the board in Python mode, and magically the board shows up like a USB drive. In addition to the circuit board, there is also a Circuit Playground series of videos on YouTube. These videos go letter by letter through the alphabet to teach kids (and adults) about electronics components. It's a fantastic series for learners of all ages. For more information, check out this post that I made.

All of the technologies shown I didn't really talk about much. On the left is Bare Electric paint. It is a conductive paint and can be used to make artistic circuits. It can be a lot of fun when combined with things like the Circuit Playground. It can be a bit pricey, especially when purchasing for a classroom. The bottom middle is littleBits, which are magnetic coding blocks. They have good documentation and there is a lot that you can do with the blocks. The major downside is the price. Because of the price, even I don't have any and I have a ton of hardware. If you can get a large grant for hardware, go ahead and get some, I don't have anything against them besides cost. There are a lot of cool projects out there that use littleBits so go forth and find them! On the top right is Snap Circuits. Their packaging may make these seem like something super boring and useless, but it actually can be used to make real circuits. Again, they can be a bit pricey, but they are cool. Snap circuits use pieces that show the circuit diagram images that snap together to look at tiny circuits in a much bigger form. This doesn't include any programming. Finally, on the bottom right is the Lilypad Arduino board. It's an adorably purple wearable electronics platform. It's not too pricey, and documentation and tutorials exist for it, but there are boards out there that are better, like the Circuit Playground or other boards that are discussed later on in this presentation.

Even though my slides have pictures on top of picture, this slide is all about Minecraft. Minecraft is a video game based in a block universe with endless possibilities. In the game, you can make complex structures with wired and coded elements using "Redstone". Besides being a fun game, an educational version exists and includes features that allow you to create your own classroom environment. You can chose the biome that your classroom is setup in, and choose specific tasks for your students to complete. Additionally, you can code elements to show up in the game using Makecode. There is a free trial that you can try before having your school purchase licences for your entire classroom.

Code.org is a free resource for computer science education. Every year in December, for Computer Science Education Week, they promote the Hour of Code activity. They have a wide range of activities that include popular characters for students to try out block coding (drag and drop). For the hour of code activities, they include videos and code challenges designed to take an hour of time. There are also more complex lesson plans available that take multiple hours to complete.

3D printing is a fun technology that allows you to build 3D models of objects using low cost plastic, placed down layer by layer. Lots of printers do require a large learning curve for someone who is brand new, and can be quite costly for the printer itself. The printer pictured is the model of printer that I own. I recommend it for a couple of reasons. One is that it is low cost while still being easy to use. Another is that it is portable. I am able to unplug it and travel with it to do demonstrations and I have had no problems with it. Even though it doesn't print at the highest quality and the print size is small, it still can do a lot.

The Raspbery Pi is a staple when it comes to electronics. You can code in several languages, and you can even program an Arduino using the Pi. It is a complete computer in a single board sized package. They are low cost and require very little setup. All of the software and memory is stored on an SD card, so if you wanted to you could provide every student with an SD card and just have one set of Raspberry Pi boards. Since some of the boards are so low cost, they are very popular for Internet of Things (IoT) projects. I have worked with RetroPie to emulate old games that I own but my game system no longer works, and I have used a Raspberry Pi to make a photo frame with images from Google Drive. Like everything on this presentation, the possibilities are endless.

Chibitronics are most commonly known for their circuit stickers, used for making paper circuits with a special copper tape to connect the elements together. They also have a programmable circuit board that is relatively new called the Love to Code chip. It clips onto the page and easily tapes to other circuit elements. Paper circuits can also be made with tape, a battery, and bare components. Lots of tutorials exist online so a quick search can find some.

The BBC Micro:bit became popular in the UK. You can get it in a kit that includes the board, a battery pack, batteries, and a cable, which is everything you need to get started with programming on the board. You have several options to code in, including additional ones on the Micro:bit website. It's a great option that is comparable to the Circuit Playground. Personally I still prefer a Circuit Playground, but these boards are still good.

Arduino is a building block of maker circuits. It is both a line of circuit boards and a programming language based on C. It is good for robotics and can be used in a wide range of projects. When people refer to a project made with Arduino, they usually are using an Arduino Uno R3.

Adafruit Industries is an electronics manufacturing company in New York City run by Limor Fried, known as LadyAda. They make Open Source hardware, meaning all of the documentation to build and use the hardware is available to you for free. They have thousands of learn guides on their site and they have opportunities to see what people are doing in the community during weekly livestreams. All of the live videos are recorded so they can be watched at a later time. They also do discounts for educators to buy products for their classrooms.

The Metro and the Metro Express are both shaped like an Arduino Uno and can be used with almost all of the same things as an Uno. There are a few differences, including the height of the components, locations of on board LEDs, and the fact that the Metro Express can run Circuit Python (Python for Adafruit Microcontrollers).

These boards are small and come with several different chips and capabilities. If you are looking to make a bluetooth controlled robot, use one of these. If you are looking to do something simple, a feather may not be the board you are looking for. Definitely read up on whatever feather you are looking at using and make sure that that version of the feather does what you want it to do.

The Gemma and Flora are both wearable circuit boards. They can be sewn into projects or soldered. Unfortunately, there are no built in sensors on each board making it not the best if you want to have a wearable project with additional sensors. If you want sensors, go with a Circuit Playground. If you want to use Python, the Gemma M0 is the Circuit Python version of the Gemma.

This is Makecode. At the presentation, we did live demonstrations of coding using this platform, which is extremely easy to use. A person with no experience can get started with coding in less than five minutes. Once the board is in Python mode, download the program from Makecode and drag it onto the board. It will instantly reset and start the new code. If you want to see what a board can do, check out Makecode to see what it can do and how you can use it.

Using circuits and code in your classrooms is super helpful for your students. They can develop logical thinking, follow the scientific method, and more, all through inquiry based learning. There are a lot of tools out there to help you, and your students learn how to use the technology in your classroom. Since you and your students are all beginners, I would choose a technology and coding language where there is a lot of documentation available readily for free. In these slides I recommend a lot of hardware and software because I like it and I like what you can do with it. Usually there are also fantastic guides on how to use each piece of technology. If I recommend a piece of hardware or software, I have most likely used it myself. There are a few exceptions to that rule, however, and I will mention that whenever something like that comes up.

There is no clear, distinct definition of who or what a Maker is. In general, a maker is somebody who seeks out learning and uses their skills combined with creativity to create something new. In the maker mentality, everything is a tool and everything is also a material to make with. Makers commonly use electronics, 3D printing, cardboard, and hot glue, along with anything else they find to make projects. The maker mentality is very similar to inquiry based learning, and maker education does follow a lot of the NGSS standards for education. Personally, I have not done a ton of research into NGSS standards because I am not a teacher and I don't have to know them or apply them.
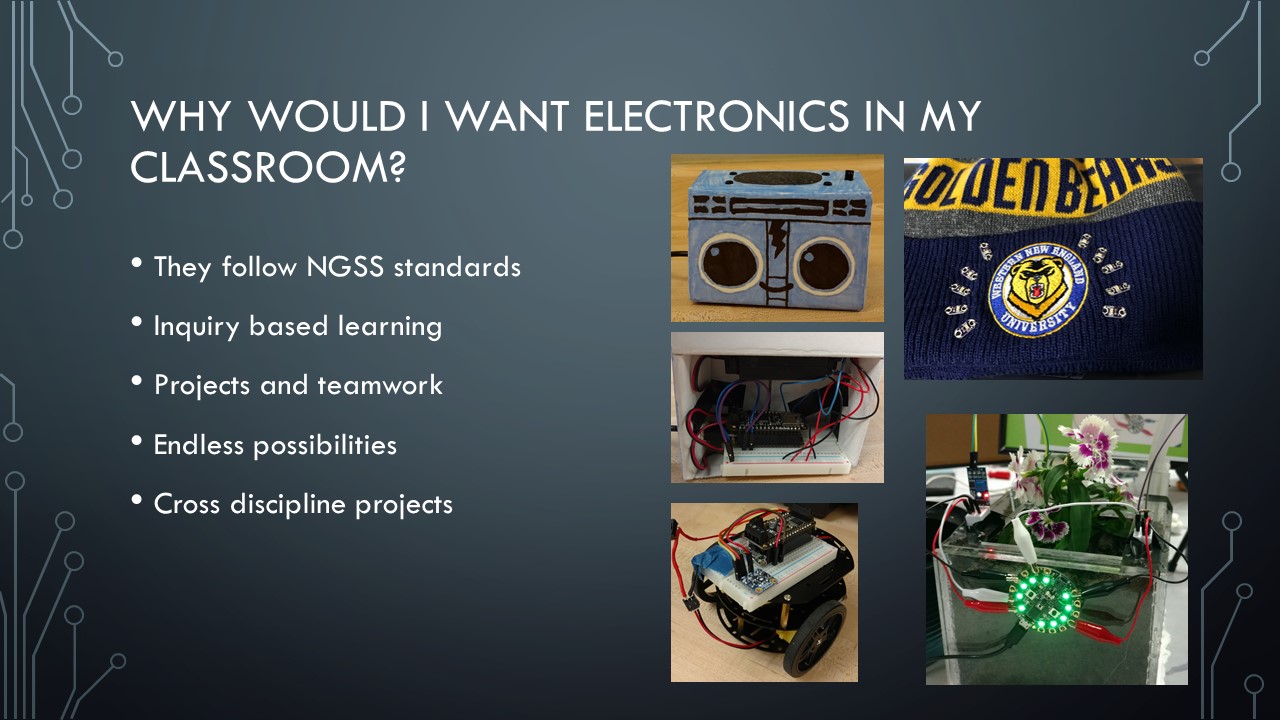
The photos on the right of the slide are of projects that I have done. Top left and middle left are both pictures of the same project. It is a small boombox made out of a cardboard box with real electronics inside. It does work, and can play internet music or music off of an SD card. Bottom left is a small robot that can be controlled with a smartphone app. Top right is a hat with wearable lights sewn in that are programmed to blink in a pattern. Bottom right is a plant monitoring station. I find that these projects show a variety of what can be done with some simple electronics (although they seem complicated). You can include some simple code and electronics into a variety of STEM classroom settings, for example, a section on the weather can use temperature and barometric pressure sensors to learn more about the weather, and changes in the weather.

The Circuit Playground is one of my all time favorite boards. It has a bunch of sensors and programmable things. It also has really good documentation and a bunch of projects exist on different tutorial platforms to get some ideas for what you could do with it. The classic version of the board costs a little less than the express, and can only be programmed in the Arduino (my favorite language so far). The express version can be programmed in Arduino too. It costs more than the classic, but it includes additional sensors, and can be programmed using Microsoft's MakeCode and Circuit Python in addition to Arduino. If you want to program in something other than Arduino, you can put the board in Python mode, and magically the board shows up like a USB drive. In addition to the circuit board, there is also a Circuit Playground series of videos on YouTube. These videos go letter by letter through the alphabet to teach kids (and adults) about electronics components. It's a fantastic series for learners of all ages. For more information, check out this post that I made.

All of the technologies shown I didn't really talk about much. On the left is Bare Electric paint. It is a conductive paint and can be used to make artistic circuits. It can be a lot of fun when combined with things like the Circuit Playground. It can be a bit pricey, especially when purchasing for a classroom. The bottom middle is littleBits, which are magnetic coding blocks. They have good documentation and there is a lot that you can do with the blocks. The major downside is the price. Because of the price, even I don't have any and I have a ton of hardware. If you can get a large grant for hardware, go ahead and get some, I don't have anything against them besides cost. There are a lot of cool projects out there that use littleBits so go forth and find them! On the top right is Snap Circuits. Their packaging may make these seem like something super boring and useless, but it actually can be used to make real circuits. Again, they can be a bit pricey, but they are cool. Snap circuits use pieces that show the circuit diagram images that snap together to look at tiny circuits in a much bigger form. This doesn't include any programming. Finally, on the bottom right is the Lilypad Arduino board. It's an adorably purple wearable electronics platform. It's not too pricey, and documentation and tutorials exist for it, but there are boards out there that are better, like the Circuit Playground or other boards that are discussed later on in this presentation.

Even though my slides have pictures on top of picture, this slide is all about Minecraft. Minecraft is a video game based in a block universe with endless possibilities. In the game, you can make complex structures with wired and coded elements using "Redstone". Besides being a fun game, an educational version exists and includes features that allow you to create your own classroom environment. You can chose the biome that your classroom is setup in, and choose specific tasks for your students to complete. Additionally, you can code elements to show up in the game using Makecode. There is a free trial that you can try before having your school purchase licences for your entire classroom.

Code.org is a free resource for computer science education. Every year in December, for Computer Science Education Week, they promote the Hour of Code activity. They have a wide range of activities that include popular characters for students to try out block coding (drag and drop). For the hour of code activities, they include videos and code challenges designed to take an hour of time. There are also more complex lesson plans available that take multiple hours to complete.

3D printing is a fun technology that allows you to build 3D models of objects using low cost plastic, placed down layer by layer. Lots of printers do require a large learning curve for someone who is brand new, and can be quite costly for the printer itself. The printer pictured is the model of printer that I own. I recommend it for a couple of reasons. One is that it is low cost while still being easy to use. Another is that it is portable. I am able to unplug it and travel with it to do demonstrations and I have had no problems with it. Even though it doesn't print at the highest quality and the print size is small, it still can do a lot.

The Raspbery Pi is a staple when it comes to electronics. You can code in several languages, and you can even program an Arduino using the Pi. It is a complete computer in a single board sized package. They are low cost and require very little setup. All of the software and memory is stored on an SD card, so if you wanted to you could provide every student with an SD card and just have one set of Raspberry Pi boards. Since some of the boards are so low cost, they are very popular for Internet of Things (IoT) projects. I have worked with RetroPie to emulate old games that I own but my game system no longer works, and I have used a Raspberry Pi to make a photo frame with images from Google Drive. Like everything on this presentation, the possibilities are endless.

Chibitronics are most commonly known for their circuit stickers, used for making paper circuits with a special copper tape to connect the elements together. They also have a programmable circuit board that is relatively new called the Love to Code chip. It clips onto the page and easily tapes to other circuit elements. Paper circuits can also be made with tape, a battery, and bare components. Lots of tutorials exist online so a quick search can find some.

The BBC Micro:bit became popular in the UK. You can get it in a kit that includes the board, a battery pack, batteries, and a cable, which is everything you need to get started with programming on the board. You have several options to code in, including additional ones on the Micro:bit website. It's a great option that is comparable to the Circuit Playground. Personally I still prefer a Circuit Playground, but these boards are still good.

Arduino is a building block of maker circuits. It is both a line of circuit boards and a programming language based on C. It is good for robotics and can be used in a wide range of projects. When people refer to a project made with Arduino, they usually are using an Arduino Uno R3.

Adafruit Industries is an electronics manufacturing company in New York City run by Limor Fried, known as LadyAda. They make Open Source hardware, meaning all of the documentation to build and use the hardware is available to you for free. They have thousands of learn guides on their site and they have opportunities to see what people are doing in the community during weekly livestreams. All of the live videos are recorded so they can be watched at a later time. They also do discounts for educators to buy products for their classrooms.

The Metro and the Metro Express are both shaped like an Arduino Uno and can be used with almost all of the same things as an Uno. There are a few differences, including the height of the components, locations of on board LEDs, and the fact that the Metro Express can run Circuit Python (Python for Adafruit Microcontrollers).

These boards are small and come with several different chips and capabilities. If you are looking to make a bluetooth controlled robot, use one of these. If you are looking to do something simple, a feather may not be the board you are looking for. Definitely read up on whatever feather you are looking at using and make sure that that version of the feather does what you want it to do.


This is Makecode. At the presentation, we did live demonstrations of coding using this platform, which is extremely easy to use. A person with no experience can get started with coding in less than five minutes. Once the board is in Python mode, download the program from Makecode and drag it onto the board. It will instantly reset and start the new code. If you want to see what a board can do, check out Makecode to see what it can do and how you can use it.

Comments
Post a Comment